


Cannabis Basics: Your Complete Growing Hub
- Before You Start: Know the Lingo
- 1. Cannabis Basics
- 2. Indoor vs. Outdoor Growing
- 3. Choosing Seeds
- 4. Plant Anatomy
- 5. Plant Life Cycle
- 6. Starter Setup for Growing
- 7. Growing on a Budget
- 8. Key Environmental Parameters
- 9. Care & Feeding
- 10. Harvesting & Storage
- 11. Common Mistakes Beginners Make
- 12. Effects & Consumption
- 13. Slang & Forum Terms

Welcome to the ultimate cannabis cultivation hub. This guide is designed to walk you through every step of the process – from choosing your seeds to curing your buds – all in one place. Think of it as your growing encyclopedia, with quick explanations here and detailed deep dives linked at the end of each section.
Before You Start: Know the Lingo
Every grower starts with the same challenge: the jargon. Cannabis culture has its own language, and if you don’t know it, reading grow guides can feel like deciphering a code. Here’s a starter glossary with must-know terms and a few slang expressions you’ll encounter on forums.
Auto (autoflowering seeds) – blooming automatically after three to four weeks, regardless of light schedule (autoflower vs. feminized).
Photo (photoperiod seeds) – start flowering only when the light cycle changes (18/6 to 12/12) (what is photoperiod cannabis).
Feminized seeds – produce almost exclusively female plants, i.e., buds (feminized vs. regular seeds).
Veg (vegetative stage) – growth phase during which the plant develops leaves, stems, and roots (vegetative stage guide).
Bloom (flowering stage) – when buds form and mature (flowering cannabis).
Trichomes – resinous crystals on buds that store cannabinoids and terpenes (what are trichomes).
Curing – the process of aging and fermenting buds in jars to enhance flavor and potency (drying & curing guide).
pH – acidity level of soil or water, crucial for nutrient uptake (best pH for cannabis).
NPK – the three main nutrients: nitrogen (N), phosphorus (P), and potassium (K).
LST (low stress training) – bending and tying down branches to increase yields (LST vs. HST).
Pro tip: If you see the term “pheno hunting” on a forum, it means growers are selecting the best phenotype out of several plants grown from the same strain.
1. Cannabis Basics
Before diving into lights, nutrients, or setups, you need to understand the plant itself and what makes one strain different from another.
Sativa, Indica, Hybrid
Cannabis strains fall into three broad categories:
Sativa: taller plants, longer flowering, energizing cerebral effects.
Indica: shorter plants, faster flowering, relaxing body-focused effects.
Hybrid: a mix of both, offering balanced growth and effects.


Feminized, Regular, Photoperiod, Autoflower
Before you even plug in a grow light, you’ve got one major choice to make: seeds. The kind you pick will set the tone for the entire grow. Learn the lingo early and you’ll dodge rookie disasters – like a crop of male plants when all you wanted was bud. Nail this step, and you’re way more likely to match the plant’s genetics to your schedule, square footage, and level of ambition.
Feminized seeds almost always grow into bud-producing females.
Regular seeds give both males and females, which are useful for breeding but less predictable for beginners.
Photoperiod seeds need a change in light schedule to start flowering, giving growers more control over veg time, plant size, and recovery if something goes wrong.
Autoflowers, on the other hand, switch to bloom on their own after just a few weeks. That means you don’t have to worry about light cycles, but it also leaves little room for mistakes, since you can’t extend the veg stage for recovery. For beginners who want a safer option, feminized photoperiods are usually the better choice.
Read more: Autoflower vs. Feminized, Photoperiod Explained.
THC & CBD
The two most famous cannabinoids:
THC – psychoactive, produces the “high”, meaning the euphoric, uplifting, and mind-altering effects many people associate with cannabis.
CBD – non-psychoactive; it still acts on the central nervous system but without causing the “high.” Instead, it’s valued for its calming, balancing, and therapeutic properties.
Read more: List of Cannabinoids.
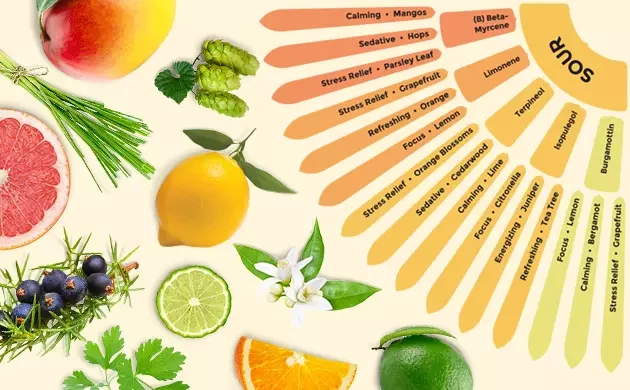
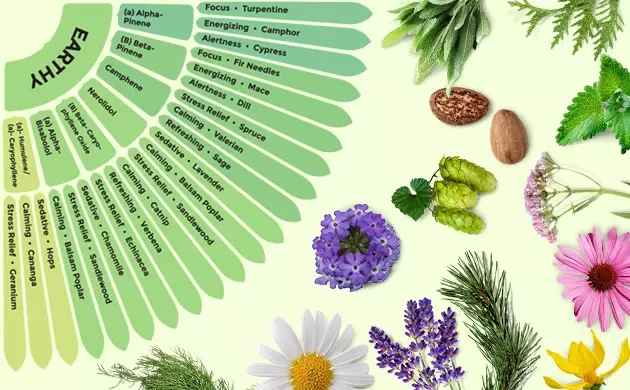
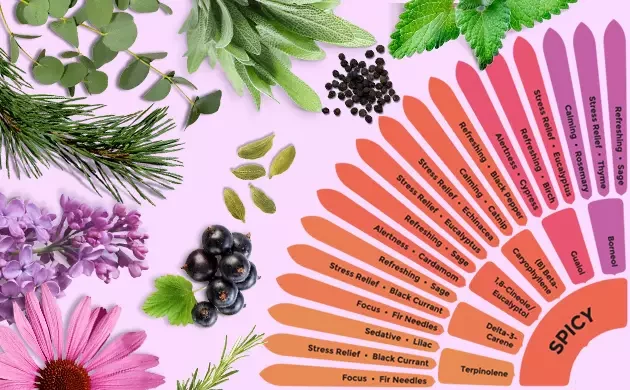
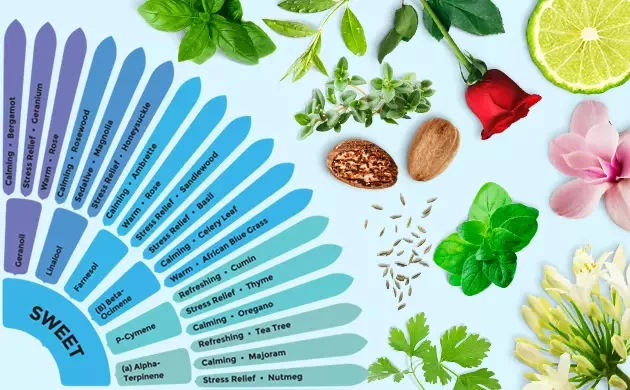
Terpenes
These aromatic compounds give cannabis its distinctive flavor and aroma, ranging from citrus to pine to diesel. They also shape the experience by interacting with cannabinoids in what’s known as the “entourage effect.”

2. Indoor vs. Outdoor Growing
Where you grow your cannabis is one of the most important decisions you’ll make. Each environment has its unique benefits and challenges.
Indoor Growing:
Pros: Complete control over light, temperature, and humidity. Perfect for stealth and year-round harvests.
Cons: Requires investment in equipment (lights, fans, grow tent) and comes with higher electricity bills.
Read more: Growing Weed Indoors for Beginners.
Outdoor Growing:
Pros: Free sunlight, fresh air, and large plants with potentially huge yields. Minimal equipment required.
Cons: Dependent on climate, weather, and season. Harder to hide from neighbors or defend against pests.
Read more: Guide to Growing Weed Outdoors.
Greenhouse Growing:
Pros: The best of both worlds – natural sunlight with some protection from weather and pests. Allows extended seasons.
Cons: Requires building and maintaining a greenhouse. Less stealthy than indoor grows.
Read more: Growing Cannabis in a Greenhouse.
Pro tip: If your summers are too short or your climate too harsh, consider a micro or stealth grow indoors, or a small greenhouse outdoors. This gives you flexibility without major costs.
Legal disclaimer: The cultivation of cannabis is subject to local laws and regulations. Always check the legal status in your country or region before starting a grow.
3. Choosing Seeds
Selecting the right seeds is the first step toward a successful grow. The choice depends on your goals, environment, and level of experience.
Beginner-friendly strains: These are resilient, fast, and less sensitive to mistakes – ideal if it’s your first grow.
Feminized seeds: Great for growers who want guaranteed bud production without the risk of males.
Autoflowering seeds: Perfect for small or stealth grows, autoflowers bloom automatically after a few weeks and are generally quick to harvest.
Read more: Autoflower vs. Feminized.
Photoperiod seeds: Offer more control and potentially bigger yields, but require specific light schedules to start flowering.
Read more: What is Photoperiod Cannabis.
Pro tip: Not sure where to start? Take Herbies’ interactive quiz – it matches you with the perfect strain based on your grow setup, climate, and preferences.
Quiz: Cannabis Seed Quiz – Find Your Best Match
4. Plant Anatomy

To grow cannabis successfully, it helps to know your plant inside and out. Each part plays a specific role in growth, health, and yield.
Roots – Absorb water and nutrients from the growing medium. Healthy roots are white and spread evenly through the soil or hydro system.
Stem – Supports the plant and acts like a highway, transporting water and nutrients upward.
Nodes – The points on the stem where branches and leaves emerge. New growth often starts here.
Cola – Dense clusters of buds that form at the top of the main stem and side branches. The main cola at the top is usually the largest.
Fan leaves – Large leaves that capture light for photosynthesis. They’re iconic but not smoked.
Sugar leaves – Smaller leaves covered in trichomes that grow within buds. Often used for extracts.
Buds – The flowers of the plant, and the part that growers harvest, cure, and consume.
Pistils – Hair-like structures that start off white and darken as buds mature. They indicate the plant’s stage of ripeness.
Trichomes – Resin glands that produce cannabinoids and terpenes. Under magnification, they look like tiny glass mushrooms.
Male vs. Female vs. Hermaphrodite
Knowing the sex of your plants early can save your harvest. Female plants are the only ones that grow smokable buds, while males and hermaphrodites can pollinate them, leading to seeds instead of dense flowers.
Female plants grow buds.
Male plants produce pollen sacs, useful for breeding.
Hermaphrodites show both traits and can pollinate your females, lowering bud quality.
Read more: Male vs. Female Cannabis, Male Marijuana Plants – What Can You Do With Them?.

5. Plant Life Cycle
Cannabis goes through several distinct stages. Each one requires different care in terms of light, nutrients, and environment. Knowing the timeline helps you plan your grow and avoid mistakes.

Germination (3-10 days):
Seeds crack open and produce a taproot.
Place them in moist soil, a paper towel, or a starter cube.

Seedling Stage (2-3 weeks):
First leaves (cotyledons) appear, followed by sets of true leaves.
Plants are delicate – avoid overwatering or too much light.

Vegetative Stage (4-8 weeks, sometimes longer):
Rapid growth: stems, branches, and fan leaves develop.
Plants need lots of nitrogen, strong light, and space to spread.

Flowering Stage (6-10 weeks for most strains):
Light cycle changes to 12/12 for photoperiod plants.
Buds form, pistils emerge, trichomes develop. Most strains finish within this window, but some Sativa varieties can take up to 14 weeks, so be prepared for a longer wait if you’re growing them.

Harvest:
Buds ripen based on pistil color and trichome development.
Read more: From Seed to Flower, How Long Does It Take to Grow Weed?.
Pro tip: Autoflowering plants skip the light-cycle dependency. They move from seedling → veg → bloom automatically, usually finishing in 70-80 days total.
6. Starter Setup for Growing
Before you plant your first seed, you’ll need a basic setup. It doesn’t have to be fancy – you can start simple and upgrade later.

Seeds
Choose beginner-friendly genetics: resilient, fast, and forgiving of mistakes.
Read more: Cannabis Seeds for Beginners.
Growing Space
Think of your grow space as the stage for the whole operation. Whether it’s a tiny tent in a studio apartment or a tucked-away corner of a backyard, the right spot sets the vibe and keeps your plants happy and discreet.
Indoor: A grow tent, closet, or even a windowsill. Tents give you full control.
Read more: DIY Grow Tent.
Outdoor: Balcony, garden, or greenhouse. Stealth growers can try windowsills.
Read more: Growing on a Windowsill.
Lighting
Light is the plant’s fuel, and getting it right is half the battle. From plug-and-play LEDs to old-school sodium lamps, the type of light you choose will shape everything from growth speed to flavor.
LED: Energy-efficient, low heat, great for beginners.
HPS (high pressure sodium): Powerful but hot; good for flowering.
CFL: Cheap and simple, good for seedlings.
Read more: How to Choose Cannabis Grow Lights.
Growing Medium

What your plant’s roots sit in is just as key as what shines above. The growing medium decides how you’ll water, feed, and troubleshoot – and it can make the difference between a laid-back grow and constant tinkering.
Soil: Easiest option for beginners, forgiving and natural.
Read more: Best Soil for Growing Cannabis.
Coco Coir: Holds water well, allows for faster growth.
Read more: Growing in Coco Coir.
Hydroponics: No soil, just water + nutrients. Faster growth but trickier to maintain.
Read more: How to Grow Marijuana Hydroponically.
Living / Super Soil: Nutrient-rich soil that feeds plants naturally.
Read more: Growing Cannabis in Living Soil, Growing in Super Soil.
Pots & Containers
Fabric pots, air-pots, or even simple grow bags help roots breathe and prevent overwatering.
Read more: Best Pots for Growing Weed.
Airflow & Climate
Think of airflow and climate control as your invisible support crew. Good circulation keeps pests and mold away, while steady temps and humidity mean fewer surprises come harvest time.
Small fans to circulate air.
Thermometer + hygrometer for monitoring.
Basic timer for lights.
Pro tip: If you’re just testing the waters, start with soil, LED lights, and a fabric pot. This combo is simple, cheap, and gives solid results.
7. Growing on a Budget
Not every grow requires expensive gear. With some creativity, you can start cultivating cannabis on a tight budget and still get great results.
Minimal Equipment
Skip the shopping spree. With a few smart picks, you can build a lean, efficient setup that delivers dense buds without draining your bank account.
✓ Grow tent: 2×2 ft (or 2×4 ft if you want extra space)
✓ LED panel with dimmer (efficient and adjustable light)
✓ Carbon filter + fan (for airflow and odor control)
✓ Fabric pot: 3-5 gallons
✓ Light soil mix with perlite (for better drainage and aeration)
✓ pH pen + EC meter (to monitor water and nutrients)
✓ Timer (to control light cycles)
✓ Thermo-hygrometer (to track temperature and humidity)
With just this setup, you can run a full grow cycle for a single plant indoors.

DIY Hacks
Your next grow store might be the recycling bin. With a bit of ingenuity, everyday household items can double as plant gear and save you some serious cash.
Use household containers (with drainage holes) instead of store-bought pots.
Repurpose a closet, cardboard box, or cabinet as a mini grow space.
Small desk fans work fine for air circulation.

Affordable Soil & Nutrients
Great soil doesn’t have to come with a boutique price tag. Local garden centers often carry everything you need for lush, healthy plants at a fraction of the cost.
Garden store soil mixed with perlite improves drainage and aeration.
Read more: Perlite for Cannabis.
Start with basic nutrient kits or even organic options like compost and worm castings.
Read more: Organic Cannabis Growing.
Step-by-Step Upgrades
As you gain experience and harvests, reinvest in better lights, ventilation, and tents.

Pro tip: Don’t cut corners on light and airflow – these two factors matter more than fancy nutrients or pots when it comes to healthy plants.
8. Key Environmental Parameters
Cannabis thrives only when its environment is balanced. Too hot, too cold, too wet, or too dry, and your plants will struggle. Here are the most important factors to watch out for.
Temperature
Cannabis plants are very sensitive to temperature. Too cold, and growth slows down; too hot, and plants get stressed, which can reduce yield and potency. Staying within the right range at each stage of growth helps your plants develop healthy roots, strong branches, and dense, resinous buds.

Color code: Green – optimal range, Yellow – acceptable but not ideal, Red – not suitable.
Read more: Perfect Temperature for Growing Marijuana.
Humidity
Humidity affects how easily plants can absorb water through their leaves and how likely they are to develop mold or attract pests. Young plants require more moisture in the air, while flowering plants prefer drier conditions to keep their buds dense and healthy.
RH stands for relative humidity – the percentage of water vapor in the air compared to how much the air could hold at that temperature.

Color code: Green – optimal range, Yellow – acceptable but not ideal, Red – not suitable.
Read more: Controlling Humidity in Your Grow Room.
pH
The right pH keeps nutrients available to your plants. If it’s too high or too low, essential elements like nitrogen or calcium get locked out, causing deficiencies even when they’re present in the soil or solution. For soil grows, aim for 6.0-7.0; in hydro or coco, stay between 5.5-6.5 for optimal uptake.

Read more: Best pH for Cannabis.
Light Schedule
Light tells your plants when to grow and when to bloom. During vegetative growth, most growers use 18 hours of light and 6 hours of darkness (18/6). Switch to 12/12 to trigger flowering. Autoflowering strains are different – they’ll bloom on their own but thrive with 18-20 hours of light daily.
Read more: Cannabis Light Schedule.
Plant Density
Too many plants in a small space mean poor airflow and higher risk of mold.
Read more: How Many Plants to Grow Per Square Meter.
Pro tip: Use a thermometer-hygrometer combo to monitor your grow room. A stable climate means fewer problems down the road.
9. Care & Feeding
Healthy cannabis plants need the right balance of nutrients, proper watering, and smart training techniques to maximize yields.
Nutrients
Feeding your plants is like dialing in a chef’s recipe: a pinch too little and growth stalls, a dash too much and you burn the crop. The key is understanding what each nutrient does and when your plants crave it most.
Macronutrients (NPK):
Nitrogen (N) – essential during veg.
Phosphorus (P) – critical for root and bud development.
Potassium (K) – supports overall plant health.
Micronutrients: Calcium, magnesium, sulfur, iron, and others in small amounts.
Read more: Cannabis Nutrients – Macronutrients & Micronutrients.
Watering
Overwatering is the #1 beginner mistake. Always let the topsoil dry slightly before watering again.
If you’re growing in soil or coco, water until you get about 10-20% runoff from the bottom of the pot – this helps flush out excess salts and ensures roots get enough oxygen. A simple trick is the “lift the pot” method: when it feels light, it’s time to water; when it’s still heavy, wait a bit longer.
Read more: Watering Cannabis.
Foliar Feeding
Spraying diluted nutrients directly onto leaves allows for quick absorption. Use this method sparingly, always at lights-off to avoid burns, and never during late flowering – otherwise you risk leaving residue on the buds and creating conditions for mold.
Read more: Foliar Feeding Guide.
Training Methods
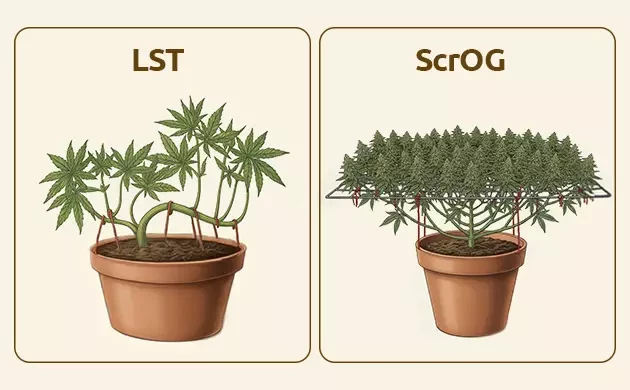
Think of plant training as sculpting with living clay. By bending, trimming, or weaving stems, you decide how light hits every bud site – which can mean fatter colas and bigger yields without extra space.
LST (low stress training): Bending and tying branches for even light exposure.
HST (high stress training): More aggressive methods like topping, fimming, or supercropping (LST vs. HST). Best left to experienced growers, as mistakes can slow growth or reduce yields. Avoid using HST on autoflowers after three to four weeks – their short veg time doesn’t allow for proper recovery. (LST vs. HST).
SoG (Sea of Green): Many small plants grown quickly (SoG Guide).
ScrOG (Screen of Green): Using a net to spread out branches (ScrOG Guide).
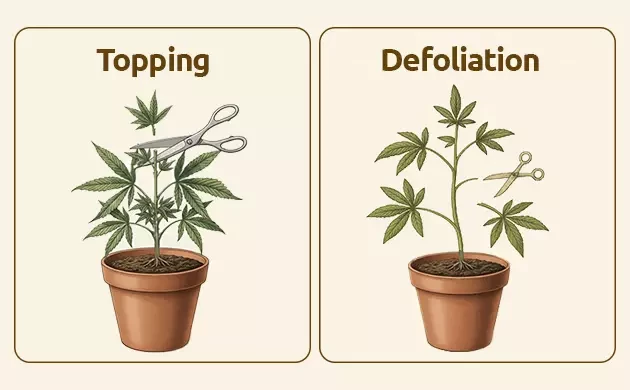
Defoliation & Schwazzing: Removing leaves to improve airflow/light penetration. This is an advanced technique and not recommended for your first grow – better to try once you already understand how your plants respond to stress (Defoliation Guide, Schwazzing Technique).
Topping vs. fimming: Cutting the main stem to encourage more colas (Topping vs. Fimming).
Note for beginners: Stick to LST and light defoliation during veg. They’re simple, safe, and effective – the more advanced methods can wait until you’ve got a few grows under your belt.
Transplanting
Moving plants into bigger pots as they outgrow their containers.
Read more: Transplanting Cannabis 101.
Flushing
Watering with pure water (no nutrients) before harvest is a common practice to improve taste and smoothness.
In soil or coco, flushing is usually done one to two weeks before harvest.
In hydroponics, even two to three days can be enough.
In living or organic soils, growers often prefer a gradual tapering of nutrients instead of a full flush.
There’s ongoing debate about whether flushing is necessary at all – many growers treat it as an optional step that depends on your substrate, feeding style, and personal preference.

Pro tip: Think of nutrients as seasoning in cooking – too little, and the dish is bland; too much, and you ruin the flavor. Balanced feeding = happy plants.
10. Harvesting & Storage
Harvest time is when all your patience pays off – but timing and post-harvest care are just as important as the grow itself.
When to Harvest
Pistils – At first, they’re white, then they gradually turn orange or brown. When most pistils have darkened and curled in, it’s a sign your buds are nearing maturity.
Trichomes – For the most accurate check, use a magnifier to look at the resin glands on the calyxes (not the sugar leaves, which mature faster):
Clear = not ready
Milky = peak potency
Amber = more sedative effect
Growers often use pistils as an early clue and trichomes as the final decision-maker.

Read more: The Best Time to Harvest Your Cannabis Plants.
Cutting & Trimming
This is where the grow turns into a hands-on art project. Sharp scissors, steady hands, and a bit of patience will decide how clean and pretty your final buds look.
Cut branches and trim off sugar leaves.
You can do a wet trim (immediately after cutting) or dry trim (after drying).
Read more: How to Trim Weed Like a Pro.
Drying
Slow and steady wins here. Drying locks in flavor and potency while preventing mold, so resist the urge to crank up the heat or rush the process.
Hang branches or place buds on drying racks.
Conditions: 18-22°C (64-72°F), 50-60% humidity, dark space with airflow.
Takes 7-14 days.
Read more: Drying & Curing Cannabis.
Curing
Think of curing like aging wine or cheese – it deepens the aroma, smooths the smoke, and brings out the plant’s full personality.
Place dried buds in airtight glass jars.
Open jars daily for 1-2 weeks (“burping”) to release moisture.
Full curing takes 4-8 weeks, improving taste, aroma, and smoothness.
Storage
Proper storage is the final safeguard for all your hard work. Keep air, light, and heat away, and your harvest will stay potent and fragrant for months.
Keep jars in a cool, dark place.
Properly stored, cannabis can stay fresh for six to 12 months without major loss in quality.
Pro tip: Rushing the drying or curing process results in harsh smoke and weaker effects. Patience at this stage leads to premium buds.
11. Common Mistakes Beginners Make
Every grower slips up in the beginning – but knowing the usual traps will save you time, money, and harvests.
Choosing the Wrong Strain
Not every plant fits every setup. A Sativa might grow too tall for a closet, while an autoflower might finish too quickly for a long summer season.

Ignoring the Smell
Cannabis gets pungent during flowering. Beginners often underestimate this, leading to unwanted attention. Carbon filters or outdoor camouflage are essential.
Overwatering & Overfeeding
New growers often confuse love with overcare. Too much water drowns roots, and extra nutrients burn leaves, leaving plants weaker instead of stronger.
Too much water = droopy, oxygen-starved roots.
Too many nutrients = “nute burn” (yellow or burnt leaf tips).
Bad Climate Control
High humidity can cause mold; low humidity stunts growth. Temperature swings stress plants and reduce yields.
Poor pH Management
Even with perfect nutrients, the wrong pH means the plant can’t absorb them – a common rookie issue.
Too Much Stress
Constant transplanting, trimming, or heavy training early on can shock plants, slowing growth or even killing them.
Pro tip: Less is more. Keep it simple at first – soil, basic nutrients, and one or two plants. Learn by observing how your plants respond.
12. Effects & Consumption
Cannabis affects people differently depending on strain, cannabinoid content, and terpenes. Understanding this helps you choose the right strain and method of use.
Head High vs. Body High
Think of these as two different moods in one plant. Some highs light up your brain and spark ideas; others melt you into the couch. Knowing which vibe you want helps steer the whole experience.
Head High (Sativa-like effects): Uplifting, creative, energizing. Great for daytime.
Body High (Indica-like effects): Relaxing, sedating, calming. Best for evenings.

THC & CBD Balance
The THC-to-CBD ratio is the secret dial for your high. Crank up THC for euphoria and intensity, or lean into CBD for calm focus without the buzz.
High THC strains = stronger psychoactive effects.
High CBD strains = calming without a heavy high.
Read more: What is THC.
Terpenes & the Entourage Effect
Terpenes (citrus, pine, fuel aromas) interact with cannabinoids, shaping the overall effect. This is called the entourage effect.
Tolerance & Breaks
Regular use builds tolerance, meaning you need more for the same effect. A tolerance break (T-break) helps reset sensitivity.
Side Effects
Most are mild: dry mouth, red eyes, drowsiness, or sometimes anxiety if the dosage is too high.
Methods of Consumption
The delivery method sets the pace and flavor of your high. Some hit fast and fade quickly; others build slowly and last all evening.
Smoking: Classic method, but harsh on the lungs.
Vaping: Cleaner inhalation with better flavor.
Edibles: Long-lasting effects, but take longer to kick in.
Tinctures & Oils: Sublingual, precise dosing.
Read more: Cannabis Use Subcategories.
Pro tip: Start low and go slow – especially with edibles. Effects can last six to eight hours, much longer than smoking or vaping.
13. Slang & Forum Terms
Once you start reading grow diaries and forums, you’ll run into slang that isn’t in standard grow guides. Here are the most common terms every grower should know.
Pheno hunting – selecting the best phenotype from multiple plants of the same strain.
Chopping – harvesting, cutting down the plant.
Lollipopping – trimming lower branches so that energy focuses on top buds.
Scrogging (ScrOG) – training plants under a net to maximize light penetration.
Hermie / Nanners – a hermaphrodite plant; “nanners” are the yellow pollen sacs it produces.
Dank / Fire / Gas – high-quality, potent buds.
Nute burn – nutrient burn, when leaf tips turn brown/yellow due to overfeeding.
Runoff – the water that drains after watering; helps track salt buildup.
EC / PPM – measures of nutrient strength in water (EC is universal, PPM has 500/700 scales).
Cal-Mag – calcium/magnesium supplement, often needed under LEDs or with soft water.
VPD – vapor pressure deficit; the balance of temperature and humidity that drives plant growth.
Frosty – buds covered in trichomes, looking like they’re dusted with frost.
Beans – slang for seeds.
Pro tip: Don’t be intimidated by slang – it’s just shorthand that growers use to talk faster. Once you know it, reading forums becomes much easier.
Closing Note
By now, you’ve covered the full cycle – from seeds to curing, basics to slang. Growing cannabis isn’t just a hobby; it’s a journey of patience, observation, and continuous learning.
If you feel ready to take it further: check out our veteran grower tips.
Remember: every mistake is a lesson, and every harvest is an achievement. Happy growing!
Herbies Head Shop expressly refuses to support the use, production, or supply of illegal substances. For more details read our Legal Disclaimer.
- Shared on Twitter
![icon]()
- Shared on Facebook
![icon]()


Thank you for leaving a comment for us!
Your feedback will be posted shortly after our moderator checks it.
Please note that we don’t publish reviews that: