How To Grow Autoflowering Cannabis
- What Is Autoflowering Cannabis?
- Pros And Cons Of Autoflowering Seeds
- Autoflower vs. Photoperiod: Key Differences
- The Complete Guide to Growing Autoflowers
- - Step 0: Preparation (Environment, Pot, & Soil)
- - Step 1: Germinating Your Seeds
- - Step 2: The Autoflower Lifecycle (Week-by-Week)
- - Step 3: Harvest, Drying, & Curing
- Troubleshooting Common Problems
- The Promises Of Autoflowers

If you’re interested in growing cannabis, chances are you’ve heard of autoflowering strains. But maybe you’re feeling a bit overwhelmed – autoflowers certainly raise a lot of questions! How do you grow autoflowering seeds? Where do they even come from? Well, did you know that the first autoflowering cannabis, cannabis Ruderalis, was scientifically discovered in the 1920s by Russian botanist Janischewski? Over the decades, this has turned into a successful market for tasty, quick-growing pot that gets you high. Following this exciting trend, we’re introducing the following guide to growing autoflowering cannabis that will leave no questions unanswered!
What Is Autoflowering Cannabis?
Modern autoflowering cannabis is the outcome of a cross between cannabis Ruderalis and cannabis Indica or Sativa. Cannabis Ruderalis was discovered as a type of low THC cannabis that grows in the wild with weed-like traits, in that it reaches maturity and enters the flowering stage independent of the amount of light received. Autoflowers begin to flower after 2-4 weeks in the vegetative stage, appealing to growers for the quick turnaround on a harvest.
Pros And Cons Of Autoflowering Seeds

Autoflowering cannabis strains sound like a dream – “I don’t have to worry about the light schedule?” – but like all good things, autos also come with their own setbacks.
Pros
- Fast Growth: Most autos go from seed to harvest in just 8-12 weeks.
- Beginner-Friendly: No need to manage light cycle changes to trigger flowering.
- Compact Size: Their small, stealthy build is perfect for small spaces or discreet outdoor grows.
- Multiple Harvests: Indoor growers can achieve 4-6 harvests per year.
Cons
- Smaller Yields: Generally, autos produce less bud than large photoperiod plants.
- Less Time for Recovery: The short vegetative stage means there's little time to recover from stress, disease, or training mistakes.
- Higher Light Bill (Indoors): To maximize yield, they need 18-20 hours of light per day, which can increase electricity costs.
- Limited Training Options: High-stress training (like topping) is risky and not recommended.
Autoflower vs. Photoperiod: Key Differences
To understand what makes autoflowers unique, it's helpful to compare them directly with traditional photoperiod strains.
| Feature | Autoflowers | Photoperiods |
|---|---|---|
| Flowering Trigger | Age (Automatic) | Light Cycle (12/12) |
| Total Lifespan | 8-12 weeks | 3-6+ months |
| Average Size | Small & Compact (50-100cm) | Can grow very large (1-3m+) |
| Beginner Friendliness | Very High | Moderate |
| Training Potential | Low-Stress Training (LST) only | All techniques (LST, Topping, etc.) |
The Complete Guide to Growing Autoflowers
So, you’ve weighed the pros and cons and are ready to get started. Let's walk through every step of the process from seed to a successful harvest.
Step 0: Preparation (Environment, Pot, & Soil)
Keep The Environment Under Control
The best environment for autoflowers has good airflow, the right pH, and ideal temperature and humidity. Autoflowering strains thrive at a temperature of 20-25°C (68-77°F) and a relative humidity of 50-70% during vegetation, dropping to 40-50% during flowering. To avoid burning your plants, make sure the temperature doesn’t exceed 28°C (82°F). The optimal pH range for your water is 6.0-7.0 in soil, or 5.5-6.5 in coco coir.
Start With The Final Pot
Autoflowers don’t like to be moved around. To avoid the risk of transplant shock, it's best to plant your germinated seed directly into its final pot. A 3-5 gallon (11-19 liter) fabric or air pot is a great choice as it promotes healthy root aeration.
Choose The Right Soil Mix
Autoflowering strains prefer light, airy soil with fewer nutrients than photoperiod strains need. Choose a lightly fertilized soil mix. A great starting recipe is a mix of coco coir, perlite, and compost. This provides good drainage and a gentle supply of initial nutrients.
Step 1: Germinating Your Seeds
Before your plant can grow, its seed must sprout. The paper towel method is one of the most reliable ways to germinate your seeds.
- Place a cannabis seed between two moist (not soaking wet) paper towels.
- Put the paper towels inside a plastic ziplock bag or between two plates to retain moisture.
- Store it in a warm, dark place (like a cupboard).
- Check daily. In 24-72 hours, you should see a small white taproot emerge.
- Once the taproot is about 1-2 cm long, gently plant it about 1 cm deep in your final pot, with the root pointing down.
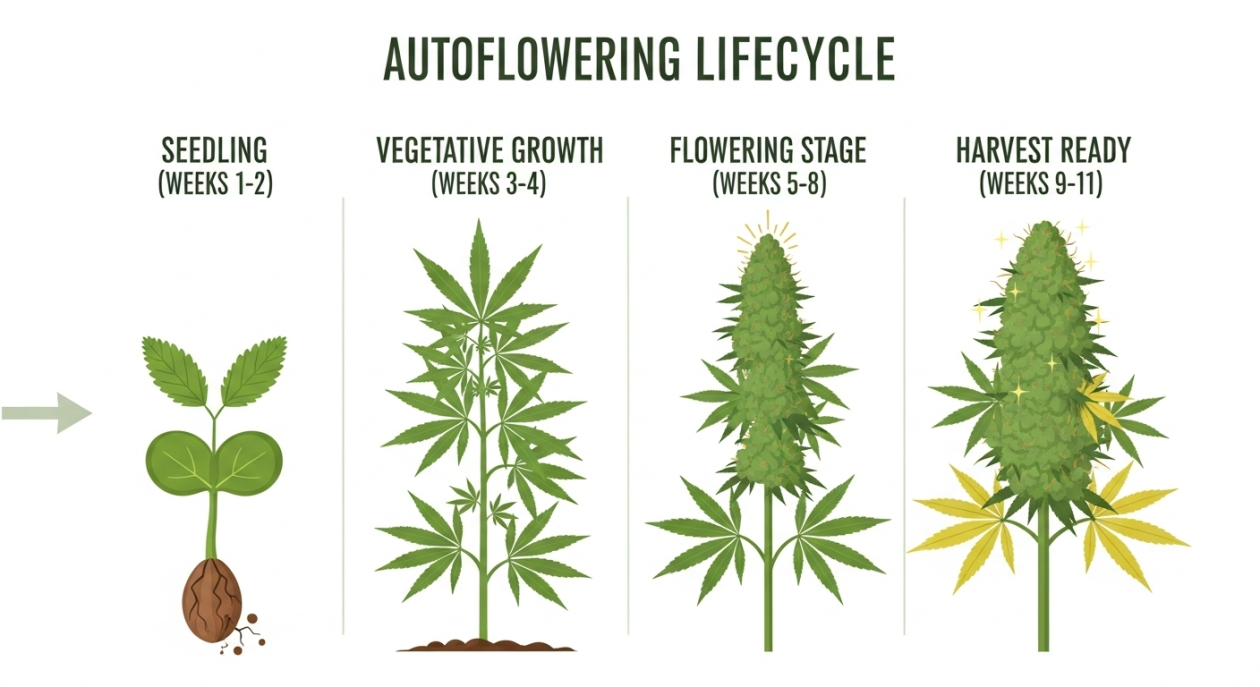
Step 2: The Autoflower Lifecycle (Week-by-Week)

Weeks 1-3: Seedling & Early Vegetation
Your plant is in its most fragile stage. Provide 18-20 hours of light per day. Water lightly around the base of the seedling, allowing the soil to dry out between waterings. Don't add any nutrients yet; the soil has enough to get started. By week 3, you can begin gentle low-stress training (LST) by carefully bending the main stem sideways to expose lower branches to more light.
Weeks 4-7: Late Vegetation & Flowering Begins
Your plant will experience a rapid growth spurt and then begin to show the first signs of flowering (small white pistils). Now is the time to start introducing a light feeding of nutrients formulated for the flowering stage. Continue with LST as needed, but avoid any training once the buds start to fatten up. Be mindful not to overfeed; autoflowers are sensitive to nutrient burn.
Weeks 8-11: Bud Development & Ripening
The main focus now is bud production. Your plant will stop growing vertically and put all its energy into developing dense, resinous flowers. Keep humidity lower (40-50%) to prevent mold. Monitor the trichomes (the tiny resin glands on the buds) with a jeweler's loupe. They will start clear, turn cloudy, and then amber. Harvest when most trichomes are cloudy for the highest THC content.
Step 3: Harvest, Drying, & Curing
Harvesting Your Plant
With autoflowers, it often makes sense to harvest gradually. The main colas at the top may be ready before the lower buds. You can harvest the ripe top buds first, allowing more light to reach the lower sections for another week to let them mature fully.
Drying Your Buds
Cut the branches and hang them upside down in a dark, well-ventilated room with a temperature of around 18-20°C (65-68°F) and humidity of 50-60%. This slow-drying process takes 7-14 days and is crucial for preserving flavor and aroma. The branches are ready when they snap instead of bend.
Curing for Quality
Once dry, trim the buds off the branches and place them in airtight glass jars, filling them about 75% full. For the first two weeks, open the jars for 5-10 minutes several times a day to release moisture ("burping"). After that, burp them once every few days. Curing takes a minimum of 2-4 weeks but can continue for months, significantly improving the smoothness, taste, and potency of your final product.
Troubleshooting Common Problems

- Yellowing Leaves (Bottom Up): This is often a sign of Nitrogen deficiency, common at the start of flowering. A light feeding of grow nutrients can help.
- Brown Spots or Burnt Tips: This usually indicates nutrient burn from overfeeding or incorrect pH. Flush your soil with plain pH-balanced water and reduce the amount of fertilizer you're using.
- Stretching and Weak Stems: Your plant isn't getting enough light. Move your light source closer or upgrade to a more powerful one.
- Droopy, Overwatered Look: You are watering too frequently. Allow the top inch of soil to become completely dry before watering again.
The Promises Of Autoflowers
Nowadays, autoflowering strains are getting more and more sophisticated. We’re in the age of the Super Auto: auto plants are growing larger, stronger and faster than ever before, containing higher THC levels and yielding bigger harvests to better compete with their photoperiod cousins. Growers rejoice, because you can still get a harvest comparable to classic cannabis strains without the time commitment. Happy growing!
Herbies Head Shop expressly refuses to support the use, production, or supply of illegal substances. For more details read our Legal Disclaimer.


Thank you for leaving a comment for us!
Your feedback will be posted shortly after our moderator checks it.
Please note that we don’t publish reviews that: