


My Experience With FastBuds Gelato Auto Seeds – Autoflower Grow Journal

Hey guys, I’ve just harvested my first mature Gelato Auto plant from FastBuds and am ready to share my experience via this cannabis grow journal. I’ve cultivated this strain before, although never from FastBuds. One of my friends who also grows weed really loves FastBuds though, so I decided to give it a try myself. I’ll admit, I grew this plant on a whim – I only popped one seed, and was lucky it germinated.
With that said, I’ve always loved Gelato. Its fruity, sweet flavor really pops, and I’m a sucker for those tastes. Gelato is a Girl Scout Cookies and Sunset Sherbet cross. Since I also love GSC, Gelato was a no-brainer for me. I usually grow Hazes and Kush strains, so I thought this would be a nice change. I’ve also never grown an autoflower strain, which made me excited to try this one out.

My Garden and Gear
I live in a temperate climate, so my only choice is to grow indoors. In this part of my marijuana grow journal, I’ll lead you through what I used to cultivate Gelato Auto.
- Grow Tent. I had an extra 0.4m2 (4.5ft2) tent, so I used that to create an environment for this Gelato Auto. Tents are my first choice since I grow in my cellar. It keeps out dust and mold while retaining the small amount of heat that my lights give off.
- Light. As for lights, I used a single 150-watt LED grow lamp for both veg and flower. Since I don’t have a ton of vertical space to work with in my grow, I like LEDs. They don’t radiate a ton of heat, so it’s okay if my canopy gets fairly close to the light.
- Growing Medium. I always grow using soilless media, which has some advantages over soil. First, soilless media dries out quickly, giving pests less chance to take root. It’s also easier to control what nutrients your plants are getting with soilless media.

FastBuds Gelato Auto: Grow Journal From Seed To Harvest
FastBuds’ Gelato Auto was very easy to grow. My plant was happy and healthy throughout the grow cycle, with the exception of a few days after transplanting. Since this is an autoflower strain, I didn’t even need to worry about changing daylight hours to trigger the flower cycle.
Weeks 1-5 (Veg):
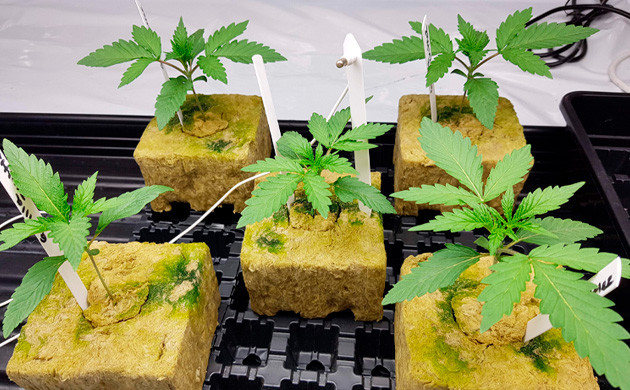
I used a hybrid type of soilless growing. First, I germinated my seed directly in a small rock wool cloning plug. Once it rooted (after 2-3 weeks), I transplanted it into a 3-gallon Smart Pot filled with coco coir.

I maintained 18 hours of light throughout the veg cycle. During the first week, I kept relative humidity around 50%. I gradually lowered it to 40% by the end of week 5. The temperature hovered around 26o Celsius (79o Fahrenheit) for the duration of the veg cycle.
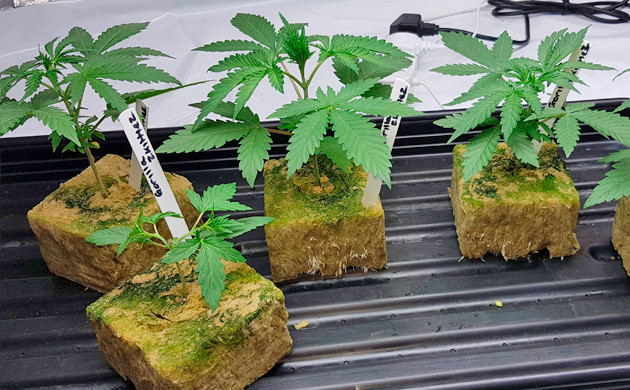
After I transplanted the rooting plug into the Smart Pot, I gave the roots a few days to expand. Then, I performed LST on my plant. This helped open up my canopy, improving airflow and light penetration.

About midway through week 4, I defoliated my plant. I removed any large fan leaves high in the canopy to allow light penetration throughout the plant. Proper light penetration minimizes larf and can help improve a strain’s quality and yield on harvest day.
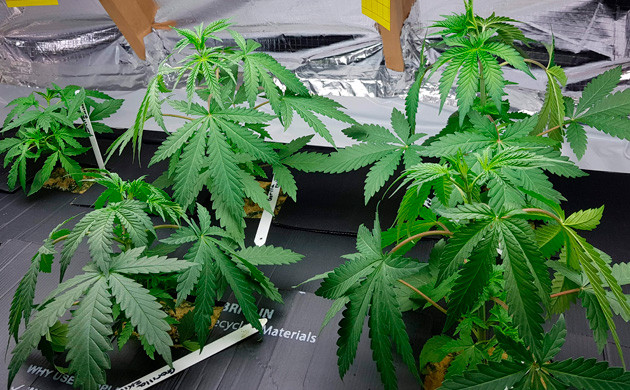
Weeks 6-11: Flower

I could actually tell when my FastBuds Gelato Auto switched into the flower cycle. It demonstrated a noticeable stretch, nearly doubling in height between weeks 6 and 8. After seeing the amount it stretched, I was happy I performed LST back in the veg cycle.

I gradually raised the temperature and humidity from the beginning of the flower cycle, increasing the relative humidity to 55% and temperature to 25oC (82oF) by week 8. Then, I gradually scaled both back down to simulate the weather changing to fall.

My plant started smelling around week 7. It started off with a faint, sweet scent, but by week 11, that had evolved into a fragrant, fruity explosion.
Nutrients For Growing Gelato Auto
Speaking of nutrients, I used a mix recommended to me by a friend. Here’s the week-by-week breakdown that I carefully jotted down for my weed grow journal. You can use this tried scheme and not be scared of over or underfeeding.
Weeks 1 and 2 (Veg Phase):
- Acti-Vera: 2ml/l (7.57ml/gal)
- Bio-Haven: 2ml/l (7.57ml/gal)
- Root-Juice: 4ml/l (15.14ml/gal)
- Calmag: 0.5ml/l (1.89ml/gal)
- pH: 5.9, TDS: 750 PPM
Week 3 (Veg Phase):
- Acti-Vera: 2ml/l (7.57ml/gal)
- Bio-Haven: 2ml/l (7.57ml/gal)
- Root-Juice: 4ml/l (15.14ml/gal)
- Bio-Grow: 2ml/l (7.57ml/gal)
- Bio-Bloom: 1ml/l (3.79ml/gal)
- Top-Max: 1ml/l (3.7 ml/gal)
- Alg-A-Mic: 1ml/l (3.79ml/gal)
- B’cuzz Coco Bloom Stimulator: 0.5ml/l (1.89ml/gal)
- Calmag: 0.5ml/l (1.89ml/gal)
- pH: 5.9, TDS: 850 PPM
Week 4 (Veg Phase):
- Acti-Vera: 2ml/l (7.57ml/gal)
- Bio-Haven: 2ml/l (7.57ml/gal)
- Root-Juice: 2ml/l (7.57ml/gal)
- Bio-Grow: 2ml/l (7.5 ml/gal)
- Bio-Bloom: 1ml/l (3.79ml/gal)
- Top-Max: 1ml/l (3.79ml/gal)
- Alg-A-Mic: 2ml/l (7.57ml/gal)
- B’cuzz Coco Bloom Stimulator: 0.5ml/l (1.89ml/gal)
- Calmag: 0.5ml/l (1.89 ml/gal)
- pH: 6, TDS: 950 PPM
Week 5 (Veg Phase):
- Acti-Vera: 3ml/l (11.36ml/gal)
- Bio-Haven: 3ml/l (11.36ml/gal)
- Bio-Grow: 3ml/l (11.36ml/gal)
- Bio-Bloom: 2ml/l (7.57ml/gal)
- Top-Max: 1ml/l (3.79ml/gal)
- Alg-A-Mic: 2ml/l (7.57ml/gal)
- B’cuzz Coco Bloom Stimulator: 0.8ml/l (3.03ml/gal)
- Calmag: 0.8ml/l (3.03ml/gal)
- pH: 6, TDS: 950 PPM
Weeks 6-8 (Flower Phase):
- Acti-Vera: 4ml/l (15.14ml/gal)
- Bio-Haven: 4ml/l (15.14ml/gal)
- Bio-Grow: 3ml/l (11.36ml/gal)
- Bio-Bloom: 3ml/l (11.36ml/gal)
- Top-Max: 1ml/l (3.79ml/gal)
- Alg-A-Mic: 3ml/l (11.36ml/gal)
- B’cuzz Coco Bloom Stimulator: 1ml/l (3.79ml/gal)
- Terpinator: 2.5ml/l (9.45ml/gal)
- Calmag: 1 ml/l (3.79ml/gal)
- pH: 6, TDS: 1000 PPM
Week 9 (Flower Phase):
- Acti-Vera: 2.5ml/l (9.46ml/gal)
- Bio-Haven: 2.5ml/l (9.46ml/gal)
- Bio-Grow: 1ml/l (3.79ml/gal)
- Bio-Bloom: 4ml/l (15.14ml/gal)
- Top-Max: 4ml/l (15.14ml/gal)
- Alg-A-Mic: 2ml/l (7.57ml/gal)
- B’cuzz Coco Bloom Stimulator: 1ml/l (3.79 ml/gal)
- Terpinator: 6.5ml/l (24.61ml/gal)
- Calmag: 0.5ml/l (1.89ml/gal)
- pH: 6.3, TDS: 1350 PPM
Week 10 (Flower Phase):
- Bio-Bloom: 2ml/l (7.57ml/gal)
- Top-Max: 2ml/l (7.57ml/gal)
- Terpinator: 6.5ml/l (24.61ml/gal)
- Calmag: 0.5ml/l (1.89ml/gal)
- pH: 6.5, 600 TDS
Week 11 (Flower Phase):
- Flush: 6.5 pH, TDS 80 PPM
Gelato Auto Cannabis Grow Journal: My Final Words

I harvested my plant after flushing in week 12. After drying my plants for a few days (it’s really dry where I live), I was left with just over 200g (7.3oz) of total weight. That comes out to about 1.39g/watt (0.05oz/watt). I was ecstatic with these numbers, considering that under the best circumstances, I expect to hit about 1g per watt with LED lights.
The quality of FastBuds’ Gelato Auto was also impressive. The plants were so sticky that I had to buy a new pair of shears after harvesting. While this strain is genetically a hybrid, it seems to have more relaxing and calming effects typical of an Indica.
I’d definitely recommend growing this strain yourself, and am going to add it to my regular grow cycle. I hope this FastBuds Gelato Auto grow journal helps anyone else who tries their hand at this incredible strain!


Herbies Head Shop expressly refuses to support the use, production, or supply of illegal substances. For more details read our Legal Disclaimer.
- Shared on Twitter
![icon]()
- Shared on Facebook
![icon]()


Thank you for leaving a comment for us!
Your feedback will be posted shortly after our moderator checks it.
Please note that we don’t publish reviews that: