


How To Roll A Perfect Joint

Even if it’s just a fanciful idea, many people wonder how to roll a perfect joint. Just as food tastes better when cooked with love, cannabis is even more enjoyable when smoked as a joint rolled with your own fingertips. From this article, you’ll learn about 3 different ways of rolling weed – broken down in short and absolutely doable actions. Just follow these easy steps to roll a joint and you’ll be ready to show off your newfound skill in no time!
Before Rolling Your Joint
Whatever type of joint you decide to roll, there will always be some steps that you need to take care of beforehand. Examine these steps and take some time to prepare everything so you don’t have to stop mid-joint if you forget something. Here’s what to consider:
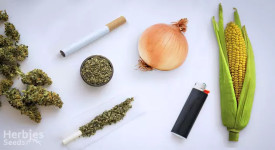
What can you use to roll weed? Get some rolling paper
Your first joint will probably come to life through multiple trial and error. Thus, to make sure you have enough room to practice and get your first doobie right and tight, you’ll ideally have a full pack of rolling papers prepared. Nowadays, any smoking supplies shop has plenty of options to choose from. However, for your first joint, we recommend picking papers of medium size with a good sticky strip.
Make the filter tip

A filter tip, aka a crutch, is almost as important to the joint as rolling papers if you really want to enjoy your smoking time. To make a filter, take a piece of thin cardboard or thick paper (5.5 x 1.7cm, or 2.2 x 0.7 inches in size), fold the first couple of millimeters several times, and roll the whole thing tightly to the end. Even though some people roll joints without a filter, this little thing makes a big difference by stopping tiny particles of weed and smoke that would otherwise burn your throat.

Prepare your weed
Simply grinding your weed isn’t enough to roll a joint you can be proud of. Take an extra step – carefully examine the contents of your grinder and toss out any sticks, seeds or hard lumps. Don’t think of yourself as being wasteful – when left in the weed mix, these parts make smoke harsh and decrease potency.
Decide if you're smoking pure or making a spliff

A spliff is a joint comprised of weed mixed with tobacco. Proportions differ depending on the reason and goal behind mixing cannabis with tobacco. It’s something to consider if you’re an inexperienced user who’s just tipping their toes into smoking marijuana, or if you don’t have enough green to fill a joint to the brim.
The One And Only, A Basic joint
Perfect in its simplicity is the good old basic joint. Now to answer the question “how can I roll a joint easily?” Master the following instructions and work your way up from there.
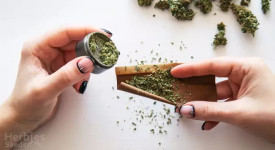
Place the materials

Take a deep breath and place the rolling paper on a table in front of you with the glue strip facing up and away. Distribute the weed evenly in the middle of the paper, leaving one side empty for the filter tip.

Decide on shape
You can either go straight or cone-shaped. The latter is easier to roll and smoother to smoke. To achieve the cone shape, place slightly more weed on the opposite side from the filter.
Insert the filter

Now place the filter in the spot you left free of weed. Usually, this is the right edge of the rolling paper. However, if you’re left-handed, you might prefer your crutch on the left.
Start rolling the joint

Take the joint prep in your hands and pinch the bottom side of the paper to its upper side. Feel the weed inside and start rolling and pressing it at the same time while making sure the green is distributed evenly (or in a cone shape). Always roll down so that the bottom (non-sticky) part of the paper will become shorter and you’ll be able to tuck it behind the filter. Once this is possible, tuck the bottom part behind the weed and finish rolling the joint.
Seal it

Use your fingertips to feel if the joint is sturdy enough. If you feel the paper is too loose, make the roll tighter. Finally, wet the sticky line and seal the joint. Use a cigarette or something else of a similar shape to lightly press your weed against the filter and pack it tighter.

Light it up
A classic finishing touch is to wrap the tip of the joint to close the opening and store until consumed.
Another Way To Roll A Joint – A Two-Paper
If the only rolling papers you’ve got at your disposal are the small cigarette ones, you can still make a joint; you’re just going to need two papers instead of one, hence the name of the final product, a two-paper.
Stick the two papers together

Place the first paper horizontally in front of you as if you were going to roll a basic joint. Get a second one, wet its glue strip and place it under the right edge of the first paper; maintain a 45-degree angle. Stick the second paper to the back of the main paper – now you’ve dramatically increased the space you can fill with cannabis.
Place the filter

Pretty self-explanatory. Just place the tip at the edge of the upper paper’s fold.
Distribute the weed

Remember our the cone shape? Evenly distribute the mix across the fold, with the most amount placed on the cross-section of the two papers.
Roll and seal it
The process here is the same as with the basic joint technique. Remember to feel the whole length of the joint with your fingertips and apply more pressure where needed to fill in any empty spaces and distribute the mix tightly and evenly. Tuck the bottom of the paper under the filter and roll your way up. Seal the joint.
Compress the weed and close the top

Press the weed down through the opening with something long and thin, then pinch and twist the top.

How About This? A Cross Joint!
Skyrocketing to popularity after its appearance in the “Pineapple Express” movie, the cross joint has instantly become a head-turner at every smoking sesh! The best thing about it is that it looks much more complicated than it really is – when in fact, this step-by-step guide is quite similar to the ones before.
Roll a regular joint
We’ve already covered how to roll a joint step by step – repeat the whole process from start to finish.
Roll a smaller joint
Use a smaller paper, smaller amount of weed or both to roll a smaller and thinner basic joint. Its size should allow it to go through the bigger joint without ripping it apart. Don’t use a filter for this one, or remove it once your joint is ready. Pinch and twist both ends.
Poke a hole through the middle of the smaller joint
Take your thinner joint and poke a hole through the middle of it with something sharp and thin like a needle or a piece of metal wire. Be careful, this tiny guy is gentle and can easily rip!
Poke a hole through the middle of the bigger joint

Find a spot in the middle of your bigger joint thick enough to pull the thinner doobie through it. Poke a hole in that spot with a needle and gently rotate it to make the hole bigger. Stop once it’s wide enough to fit the thinner joint.
Pull the smaller joint through the hole of the bigger one

It’s time to make the cross! Get your teeny tiny joint and close the gaping hole in the middle of it’s bigger brother. Now everything is in place!
Wrap glue strips around the joint to seal it

It’s time to get real crafty – to ensure swift airflow and an even burn on all sides of the cross joint, you need to make it almost airtight at the place where one joint is entering the other. To do this, cut out glue strips from a couple of rolling papers, wet them, and use these threads to cover any remaining openings where the joints meet each other.

Light all ends up
Yes, you will need to light all of the free ends up. Try to do it quick enough so the sides burn with the same speed.
Enjoy Your Perfectly Rolled Joint!

Now that you know how to make a perfectly rolled joint with your own hands, you can add another valuable skill to your personal asset. Of course, the artistry behind the classic smokable knows no borders and can’t be categorized into just the three types from this article. However, mastering the essentials is a good basis for eventually rolling the joint of your dreams.
Woohoo! You found a bonus seed promo code!
ONEMORE
Herbies Head Shop expressly refuses to support the use, production, or supply of illegal substances. For more details read our Legal Disclaimer.
- Shared on Twitter
![icon]()
- Shared on Facebook
![icon]()


Thank you for leaving a comment for us!
Your feedback will be posted shortly after our moderator checks it.
Please note that we don’t publish reviews that: