The Cheapest Grow Tent For Under 5 Bucks Is Real: Here's How You Can Make It

Cannabis plants love light! The main point of a grow tent is to maximize the amount of light your cannabis plant gets so that you can increase your yield without maxing out your power bill. However, a really fancy grow tent can set you back $200, and if that’s not in your budget, there are surely other options, right? Believe us when we say that you can build a grow tent and increase your light efficiency by over 100% for under five bucks!
The Story Behind The Cheapest DIY Grow Tent
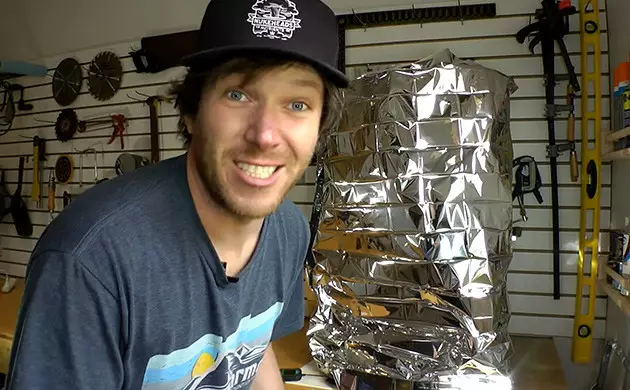
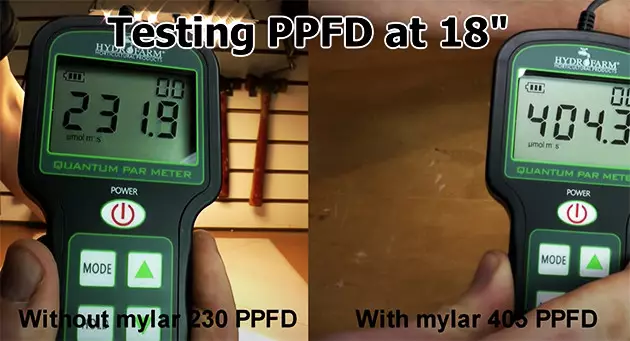
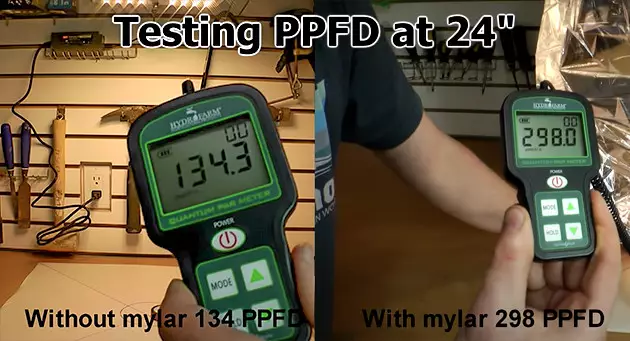
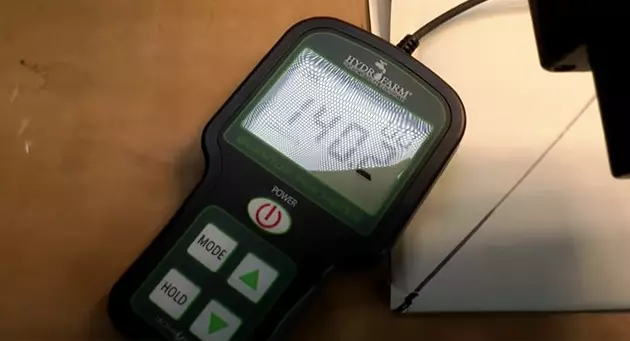
We can’t take the credit; we got this idea from this video by HowToHydroponics: Cheap DIY $2 Grow Tent! In his video, he conducts an experiment with a simple grow tent made from a hula hoop and some mylar. Using a par meter, he measures the wavelengths of light with and without the tent at 12, 18, and 24-inch intervals. In this experiment, he finds an overall 122% increase in light efficiency, all with the same grow light. The only change is the DIY grow tent! Considering how easy his tutorial was and the fact that no extra wattage is needed to provide your plant with extra light, we’re sold!
Advantages Of This DIY Grow Tent
Can such a cheap grow tent really be worth it? We know, it sounds too good to be true. In case you’re not convinced yet, here are a couple of benefits you just can’t ignore.
More Bang For Your Buck
For a price of only around $2-5 to construct, this grow tent seems too good to be true. Especially in the U.S. and Canada, dollar stores are all over the place, and they almost always have hula hoops and mylar for you to grab. Chances are, you have the rest of the materials from the video at home already. Of course, if you don’t have items like tape and string lying around the house, it may cost you a couple of extra bucks to get those supplies.
Increased Photosynthetic Energy
Aside from the low price to construct this stoner side project, this project proved to us that mylar does a great job of increasing a good LED grow light’s efficiency. Your results will be as good as your light and how far away it’s positioned from the plant. In any case, if your setup mirrors the one in the video, you should see a 122% increase in light efficiency, which means a bigger, more bountiful harvest later on!
Disadvantages Of The Cheapest Grow Tent
As with any cheap solution, you’re going to run into a couple of drawbacks by using this grow tent. Commenters on the video addressed some pretty reasonable issues with this cheap grow tent, and for a few more bucks or a little more effort, you can easily circumvent some of these problems.
Inconvenient For Plant Maintenance
As seen in the video, this grow setup doesn’t make it very easy to access the plant. Removing the mylar every time you want to do maintenance may not be ideal, especially once your plant gets bigger and more sensitive to being bumped or rubbed against. An easy solution for this problem is to spend an extra couple bucks on some zippers, and either sew them into the mylar or simply tape them on. Your total cost on this project will still be under five dollars, so it sounds worth it to us.
Poor Airflow
More expensive grow tents come with vents and ports perfect for ventilation systems and humidity control. This isn’t really an option with the cheap mylar setup. It’ll be difficult to maintain the environment of the grow tent in these respects, and commenters on the video have said that this grow tent may be a better option for young plants before they’re moved to a more advanced setup.
How To Make The Cheapest Grow Tent
If you’ve weighed the pros and cons and are still as excited as we are about this option for growing cannabis, read further to find out how to make a grow tent on a budget!
Equipment
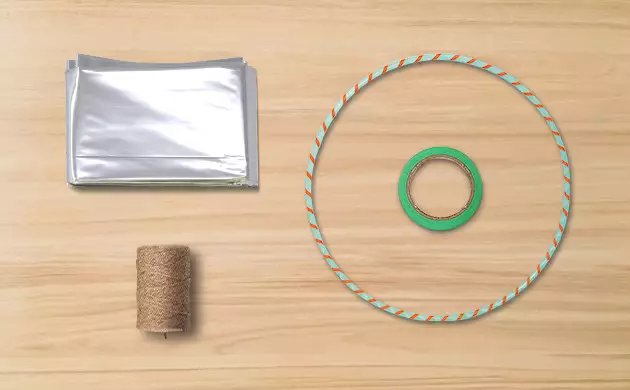
There are only a couple of things you’ll need to go buy at the Dollar Store before you can get started – the rest are probably already lying around the house. To get started, you’ll need:
- A mylar blanket, which is perfect grow tent reflective material, and can be found in the camping section
- A hula hoop with a diameter that fits your light and plant
- String or rope
- Duct tape
Directions
- Tape the mylar blanket around the hula hoop, working your way around the circumference to make sure it’s securely attached. Pay close attention to where the reflective blanket meets and make sure to tape it so that no light can escape.
- Next, you’ll need to find a way to fasten the hula hoop around the light. Many LED grow lights are designed to be held up by thin cables anyway, so you can use string or rope to attach it to the same spot where those cables meet. We’re pretty sure you can figure it out.
- And… that’s it! Of course, before you hang it up, you can always modify your DIY grow tent to your specifications, like adding zippers as mentioned before. It’s totally up to you if that’s something you’re looking for.
Who Is This Cheap Grow Tent Tutorial For?
This mylar grow tent isn’t for everyone, and is most suitable for growers on a budget looking to grow a single plant. The method is definitely intended to be a single plant grow tent, so isn’t ideal for growers who want to have a few plants growing at once. If you’re new to cannabis cultivation and don’t want to spend hundreds (yet) on your adventure into growing weed, this tent is for you. However, you should also keep in mind the implications of going with a cheap alternative to a fancy grow tent – mainly, that odor and aeration control as well as plant size will be two issues you’ll have to deal with.
Strains Suitable For Growing In The Cheapest Grow Tent
Not every strain is going to be ideal for growing in the cheapest grow tent – for example, photoperiod Sativa strains can get super tall and smelly. However, considering the hugely wide range of cannabis strains out there, you won’t have to worry about a lack of options.
Autoflowering Strains
Thanks to the ingenious crossbreeding of Sativa and Indica strains with Cannabis Ruderalis, growers have a variety of autoflowering strains to choose from. Autos don’t depend on a light schedule, instead entering the flowering stage of growth after only a number of weeks in the vegetative stage. Autoflowering strains are amazing for indoor growing anyway, because you can give them as much light as you want and they’re usually ready to harvest in 8-12 weeks. As for growing in the cheapest grow tent, autos might be perfect for it because of how resilient, compact, and quick they are.
Odorless Strains
Since we know that odor control can be an issue with this DIY grow tent, it’s worth it to check out some strains that are known to be a little less skunky while growing. No matter what, your weed is going to stink like… well, weed while you’re growing, but there are a number of strains that are more discreet to grow in terms of scent, such as Northern Lights from Royal Queen Seeds and Jack Herer from Green House Seeds. For more options, check out our Low-Odor Collection.
Strains Resistant To High Humidity
If your humidity is too high, which will probably be the case in the cheapest grow tent, there’s the risk of mold growth or root rot. These problems can totally destroy your plant and render the buds unsmokable, and we don’t want that! Luckily, there are some strains out there infamous for their resilience to mold and ability to tolerate high humidity. Our favorites are Strawberry Cough, Durban Poison, and Super Silver Haze. Any of these strains will prove to you just how hardy cannabis can be!
Honey, We’re Going To The Dollar Store!
All in all, no one can deny how great a deal the cheapest grow tent is! Especially since it can be assembled easily in about ten minutes, the low effort is definitely worth the 122% gain in light efficiency without having to dish out on extra wattage. And given the price range of $2-$5, this method is accessible for growers of all economic backgrounds. We love it, but what do you think? Are you rushing out the door to get the supplies? We’re coming too!
Herbies Head Shop expressly refuses to support the use, production, or supply of illegal substances. For more details read our Legal Disclaimer.





Thank you for leaving a comment for us!
Your feedback will be posted shortly after our moderator checks it.
Please note that we don’t publish reviews that: